Report an incident: the 3-step wizard
How a staff member files an incident on Enmantle: the 3-step wizard, attaching photos, and why the discovery date drives every deadline.
Staff report an incident through Enmantle's 3-step wizard — Capture, Confirm details, and Review & submit — choosing an incident level (UI, MUI, or Internal) and, for MUIs, a category and type. Enmantle calculates every deadline from the Discovery date * entered in step 1, since accuracy there drives everything downstream.
When something happens that needs to be reported, Enmantle walks you through it in three steps. You don't need to know the reporting rules by heart — the wizard asks for what's needed and figures out the deadlines for you. Your job is to report it, and to report it promptly.
Report it as soon as you safely can
First, make sure everyone is safe and get any help that's needed. Then file. Ohio incident deadlines run from when the incident was discovered, and some windows are short — so the sooner you file, the more room everyone downstream has. Don't wait until the end of your shift if you don't have to.
Reporting promptly is the single most important thing you can do. If you're unsure whether something rises to the level of a reportable incident, file it anyway and let your administrator review. It's always better to over-report.
Step 1: Capture
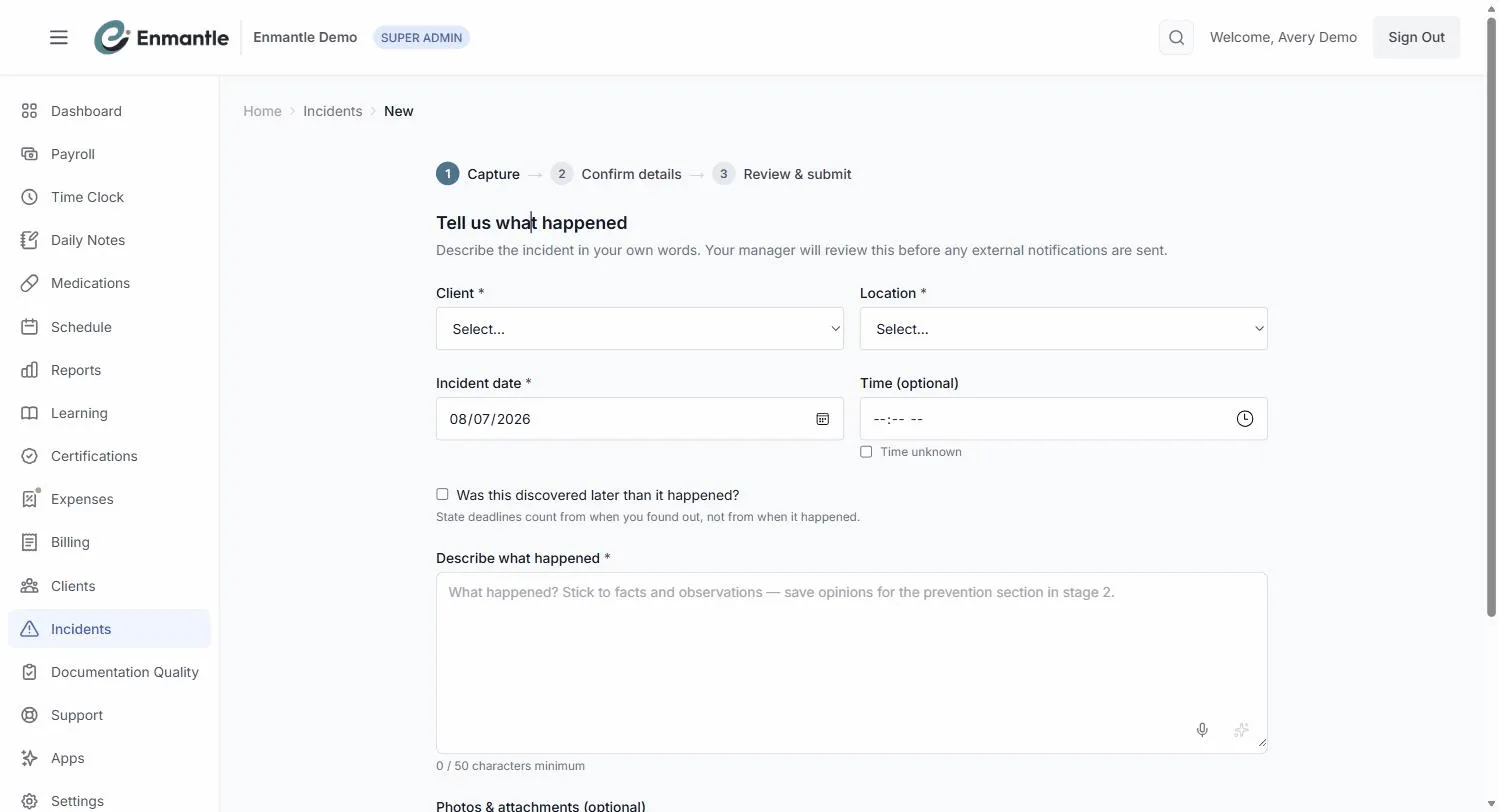
Start a new incident, and the wizard opens on its first step, headed Tell us what happened. Fill in the basics:
Client *— choose the person the incident involves.Location *— where it happened.Incident date *— the date it happened. AddTime (optional)if you know it, or tickTime unknownif you don't.- If you only found out about it after the fact, turn on
Was this discovered later than it happened?and enter theDiscovery date *. This matters: "State deadlines count from when you found out, not from when it happened." Describe what happened *— write it in plain language, sticking to what you saw and did. This needs at least 50 characters, and a counter ("N / 50 characters minimum") shows when you've written enough.
You can also attach photos here, straight from your phone — an injury, a location, property damage. Taken in the moment they beat a description written later, and if you're offline they sync once you're back on a connection. Some MUI types require a photo; if one genuinely isn't possible, record a "Photo not possible — explain why:" reason instead.
Step 2: Confirm details
The middle step, Confirm details, is where you classify the incident and fill in the specifics, grouped into sections: Classify, People involved, What you did, Injury & treatment, and Before you submit.
- Classify. Set the
Incident level *:UI (Unusual)("Internal tracking"),MUI (Major)("State-reportable"), orInternal("Provider-only matter"). If you pick MUI, you'll also choose anMUI category *(A, B, or C) and anMUI type *; if you pick UI, you'll choose aUI type *. If you're unsure which level it is, pick your best guess — your manager confirms the classification on review. - What you did.
What did you do right after? *— the immediate response you took. - People involved and Injury & treatment. Record any witnesses, and whether there was restraint, injury, or treatment.
Step 3: Review & submit
The last step shows you everything you've entered so you can check it before it goes anywhere. A completeness gate tells you where you stand: either "Ready to submit. All required fields complete." or a "Before you can submit:" list of what's still missing.
- Read back your description and confirm the dates are right.
- Confirm your photos attached.
- Tick the attestation: "I confirm this report is accurate to the best of my knowledge. I understand my manager will review it before any external notifications are made."
- Tap
Submit for review.
The moment you submit, the incident goes into your administrator's review queue, sorted against its deadline. You don't have to email anyone to route it — submitting is the hand-off.
How deadlines are calculated
You don't track the clock yourself. Enmantle calculates the deadline from the discovery date and flags the incident — which is exactly why that date has to be accurate. Deadlines only run for MUIs that have a category: a Category A MUI, for example, has a verbal county-board deadline just four hours from discovery (the rule's four-hour list also includes peer-to-peer acts, which are Category B), and every MUI's written incident report is due to the county board by 3 p.m. on the first working day after discovery (OAC 5123-17-02 (D)(7)–(8)). UI and Internal incidents carry no engine deadline. Everything after submission, including confirming the UI/MUI classification, is worked by your administrator. See Review, file, and track UIs/MUIs as an admin for what happens on their side.
If you're still learning the daily flow of a shift, your first shift, start to finish covers clocking in, documenting, and clocking out.
Deadlines and definitions above are stated as the rule states them; the rule text on codes.ohio.gov is the authority. Enmantle's own defaults are labelled as defaults.
Still stuck?
Email support@enmantle.com — a real person replies.